Roofing underlayment serves many purposes.
- Roofing underlayment protects the sheathing (decking) before the roofing cover, such as shingles or tile, is installed.
- It acts as an extra layer of protection from the weather, and in the case of wood shake and tile roofs actually is the primary protection from weather.
- Underlayment protects asphalt shingles from the resins such as sap in the wood that have a chemical reaction that can damage asphalt shingles.
- Roofing underlayment acts as insulation.
- It serves as a cushion for heavier roof coverings such as tile or slate absorbing some shock and helping prevent cracking and breaking.
- Underlayment also helps prevent hot asphalt from leaking into the building in the case of low-sloped roofs.
Saturated Felt Underlayment
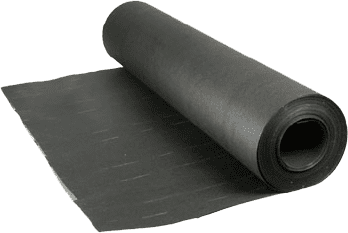
Saturated Felt Underlayment is made of asphalt or tar saturated felt. The felt is primarity rag, shredded wood, cellulose and animal fibers. Organic felt is saturated with bitumen. Asphalt felt is saturated with asphalt flux. Tarred felt is saturated with coal tar. Saturated Felt underlayment allows vapors to pass through them. Coated felts differ from saturated felts as they are coated with a glossy vapor resistant finish.
15 pound felt is sold in lengths of 144 feet, 3 feet wide which comes out to 4 roofing squares per roll and weighs 15 pounds per square.
20 pound felt is sold in lengths of 108 feet, 3 feet wide, 3 squares per roll and weights 20 pounds per square.
30 pound felt is sold in lengths of 72 feet, 3 feet wide, 2 squares per roll, and weighs 30 pounds per square.
SATURATED FIBERGLASS UNDERLAYMENT
Saturated fiberglass underlayment is made from asphalt saturated fiberglass. The glass fibers mats are made of continuous random glass fibers bonded with plastic binders reinforced with chopped, continuouse-random, or parallel glass fiber strands. There are three-types of fiberglass underlayments.
- Base sheets, which is the first membrane in a built-up roof systems.
- Ply-sheets which are used as intermediate layers in a built-up systems, or used as underlayment for a shingle, tile, or slate roof.
- Cap Sheets, which is a heavy membrane that is sometimes used instead of an aggregate in a build-up roof systems.
Base Sheets are sold in lengths of 108 feet, 3 feet wide, 3 squares per roll, and weigh 25 pounds per square.
Ply-sheets are sold in lengths of 180 feet, 3 feet wide, 5 squares per roll, and weigh 12 pounds per square.
(Type 4) Cap Sheets are sold in lengths of 36 feet, are 3 feet wide, 1 square per roll, and weight 75 pounds per square.
Organic felt deteriorates faster due to oxidation and wicking. Fiberglass felts don’t rot and they don’t absorb water so they last much longer. Fiberglass felts are also fire-resistant. The downside to fiberglass felt is that it cost about 65% more than organic felts.
Fiberglass felts should be used on roofs with a longer life expectancy such as tile roofs. Organic felts can be used on composite asphalt shingle roofs.
UNDERLAYMENT REQUIREMENTS
Underlayment must always be used when installing a shingle roof with only a couple exceptions.
Underlayment SHOULD NOT be used under a wood shingle roof because it will keep the air from circulating and allow moisture to collect reducing the life of the sheathing and the wood shingles.
Underlayment is also not required when shingling over an existing shingle roof.
The type and amount of underlayment required depends on the slope of the roof and the type of roof covering being installed. There are minimum requirements and some local building codes are stricter than others so it is important to know the local codes. It is important to keep in mind that some roof coverings such as Tile and Slate have long life expectancies up to 50 years or even more. Usually if a long-life roof fails its due to underlayment or the flashing. It is important to use heavier duty underlayments that can last the life of the roof covering.
Here is a list of underlayment minimum requirements
Asphalt Shingle Underlayment Requirements
Asphalt Shingles 2- or 3-tab (self-sealing) shingles require a minimum slope of 2 in 12. On 2 in 12 sloped roofs underlayment requirements are double coverage with 15 pound felt (nailed) and on 3/12 and steeper sloped roofs the underlayment requirements are single coverage with 15 pound felt (nailed)
Asphalt Shingles 3-tab strip (standard) shingles require a minimum slope of 2 in 12. On 2 in 12 to 3 in 12 sloped roofs underlayment requirements are double coverage with 15 pound felt (nailed) and on 4 in 12 and steeper sloped roofs the underlayment recommended. are single coverage with 15 pound felt (nailed)
Asphalt Shingles that are Individual Dutch Lap or American require a minimum slope of 4 in 12. On 4 in 12 or steeper sloped roofs underlayment recommended. are single coverage with 15 pound felt (nailed)
Asphalt Shingles that are 2- or 3- tab hexagonal require a minimum slope of 4 in 12. On 4 in 12 or steeper sloped roofs underlayment recommended. are single coverage with 15 pound felt (nailed)
For low sloped roofs it is recommended to nail on the first layer of felt followed by mopping on a 15-pound felt of type 4 fiberglass ply-sheet to keep water from leaking through the nail holes.
Fiberglass Shingle Roofs Underlayment Requirements
Fiberglass Shingles Light Weight (to 260 pounds) require a minimum slope of 2 in 12. On 2 in 12 to 3 in 12 sloped roofs underlayment requirements are double coverage with 15 pound felt (nailed) and on 4/12 and steeper sloped roofs the underlayment recommended. are double coverage with 15 pound felt (nailed).
Fiberglass Shingles Medium Weight (to 260-280 pounds) require a minimum slope of 2 in 12. On 2 in 12 to 3 in 12 sloped roofs underlayment requirements are double coverage with 30 pound felt (nailed) and on 4/12 and steeper sloped roofs the underlayment recommended. are double coverage with 30 pound felt (nailed). For roof coverings with longer lifespans it is important to use heavy durable underlayment so or the roof covering might outlast the underlayment.
Fiberglass Shingles Heavy Weight (280 pounds or more) require a minimum slope of 2 in 12. On 2 in 12 to 3 in 12 sloped roofs underlayment requirements are double coverage 1st ply is 15 pound felt and second ply is Type 4 fiberglass. On 4 in 12 or steeper single coverage 30 pound felt is recommended.
Mineral Surfaced Roll Roofing Underlayment
Single Coverage Mineral Surfaced Roll Roofing require a minimum slope of 1 in 12. On 1 in 12 to 3 in 12 sloped roofs underlayment requirements are double coverage 1st ply is 15 pound felt and second ply is Type 4 fiberglass. On 4 in 12 or steeper single coverage 30 pound felt is recommended.
Double Coverage Mineral Surfaced Roll Roofing require a minimum slope of 1 in 12. On 1 in 12 and steeper no underlayment is required. However, some contractors recommend using underlayment to protect the sheathing.
Pattern Edge Mineral Surfaced Roll Roofing require a minimum slope of 4 in 12. On 4 in 12 and steeper no underlayment is required. However, some contractors recommend using underlayment to protect the sheathing.
NOTE: For mineral rolled roofs some contractors recommend never using underlayment.
Clay Tile ROOF Underlayment
Clay Tile require a minimum slope of 3 in 12. On 3 in 12 or steeper triple coverage 30 pound felt followed by two plies of Type 4 fiberglass (mopped) recommended.
Cement Tile Underlayment
Cement Tile require a minimum slope of 2.5 in 12. On 2.5 in 12 or steeper triple coverage 30 pound felt (nailed) followed by 90 pound mineral-surfaced roll roofing (nailed)
Slate Underlayment
For slate underlayment some roofing contractors recommend using the specified underlayment for tile roofs.
Standard Slate require a minimum slope of 4 in 12. On 4 in 12 or steeper single coverage 15 pound felt (nailed) followed by 90 pound mineral-surfaced roll roofing (nailed).
Textural Slate require a minimum slope of 4 in 12. On 4 in 12 or steeper single coverage 30 pound felt (nailed).
Graduated Slate require a minimum slope of 4 in 12. On 4 in 12 or steeper single coverage 45 pound mineral surfaced rolled roofing.
Aluminum Roof Underlayment
Aluminum roofs require a minimum slope of 4 in 12. On 4 in 12 or steeper single coverage 30 pound felt (nailed).
Porcelain Roof Underlayment
Porcelain roofs require a minimum slope of 3 in 12. On 3 in 12 or steeper single coverage 30 pound felt (nailed) with 30 pound felt interlayment.
Wood Shingles & Shakes Underlayment
Wood Shakes with Space Sheathing require a minimum slope of 4 in 12. On 4 in 12 or steeper single coverage 30 pound felt underlayment starter course with 30 pound felt interlayment.
Wood Shakes with Solid Sheathing require a minimum slope of 3 in 12. On 4 in 12 or steeper single coverage 30 pound felt underlayment (nailed) with 30 pound felt interlayment.
Wood Shingles, solid or spaced sheathing require a minimum slope of 3 in 12. On 3 in 12 or steeper No underlayment is required. However, Underlayment may be desirable to protect the sheathing. Some contractors recommend on roof slopes less than 6 in 12 to nail on 30-pound felt, followed by nailing 1one Type 4 fiberglass ply-sheets. On roof slopes greater than 6 in 12 nail one course of 30-pound felt.
Copper Roof Underlayment
Copper Standing Seam, Pan or roll method require a minimum slope of 2.5 in 12. On 2.5 in 12 or steeper single coverage 15 pound felt and rosin paper.
Copper Batten seam require a minimum slope of 3 in 12. On 3 in 12 or steeper single coverage 15 pound felt and rosin paper.
Copper Flat seam require a minimum slope of .25 in 12. On .25 in 12 or steeper single coverage 15 pound felt and rosin paper.
Copper Bearing Roof Underlayment
Copper-Bearing steel standing seam, roll method minimum of slope 2 in 12. On slopes 2 in 12 or steeper No Underlayment is required however underlayment may be desirable to protect the sheathing.
Copper-Bearing pressed standing seam, roll method minimum of slope .25 in 12. On slopes 2 in 12 or steeper No Underlayment is required however underlayment may be desirable to protect the sheathing.
Lead Roof Underlayment
LEAD roofs require a minimum slope of .25 in 12. On slopes 2 in 12 or steeper single coverage with 30 pound felt and rosin paper.
Copper-Zink Alloy Roof Underlayment
Copper-Zinc Alloy roofs require a minimum slope of 3 in 12. On slopes 3 in 12 or steeper single coverage with 15 pound felt and rosin paper.
Stainless Steel Roof Underlayment
Stainless Steel roofs require a minimum slope of .25 in 12 on .25 in 12 or steeper roofs no underlayment is required.
Terne Plate Roof Underlayment
Batten seam or standing Terne Plate roofs require minimum slope of 2.5 in 12. On 2.5 in 12 and steeper roofs the underlayment required is Rosin Paper
Flat Seam Terne Plate roofs require a minimum slope of .25 in 12. On slopes .25 in 12 or steeper the underlayment required is Rosin Paper.
DRIP EDGE
Drip edge is installed at the eaves and rake of the roof to help shed water and to prevent water runoff from getting under the underlayment which could cause damage to the sheathing. Drip edge is recommended to be installed under the felt on the eaves and over the felt on the rake. If the drip edge is installed under the felt on the rake high winds can lift the felt and cause damage.
Drip edge is made from a minimum of 28-guage galvanized metal or some other non-corrosive, stain resistant metal such as terne metal.
Drip edge should be extended at least 3 inches over the roof deck and nailed in the center 8 – 10 inches apart.
In high-wind areas drip-edge should be nailed in 4 inch centers.
If more than 1 piece of drip-edge is needed to finish the rake or the eaves then the drip edge pieces should lap at least 3 inches.
On the corners drip-edge should be run 4 to 6 inches past the corner of the roof and the a cut should be made at the corner to extend the drip edge up the rake. Roof cement should be placed between the laps where the cut was made.
At gable ends the drip-edge should be installed at the beginning of the lower rakes. Again, if more that one piece is needed then they should lap at least 3 inches.
Some roofers install a product called gravel stop at the edge of the completed roof to prevent loose gravel from falling off the edge. Gravel stop has a more pronounce lip than standard drip-edge.
After the drip-edge is installed you should place a bundle off shingles at the eaves to support your ladder and protect the drip-edge from the ladder.
HOW TO CALCULATE HOW MUCH DRIP-EDGE YOU WILL NEED FOR A ROOF
An allowance of 10 percent should always be assumed for cutting.
To find the amount of drip-edge needed you will need to calculate the perimeter of the building.
The formula for finding the perimeter of a building without sloped edges is 2(Length + Width). If the building has a gable roof you will need to factor in the slope unless you are on the roof measuring the actual length of the rake and eaves.
Installing Underlayment
Roofing underlayment is installed in single-coverage, or double-coverage. Roll out the felt, nail down at the end, and stretch the felt out. You should only roll out as much felt as you can install in about one hour because heat causes felt to relax which can lead to buckling. Wind can also cause damage. Additionally, moisture such as dew in the morning can cause buckling. If there is a wrinkle in the felt that can’t be pulled out, cut it, lap the edges, and nail the felt flat.
Felt should never be installed over a wet deck!
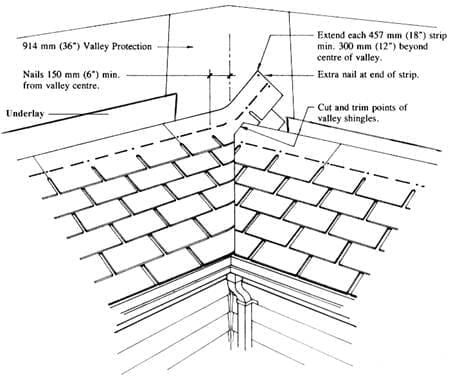
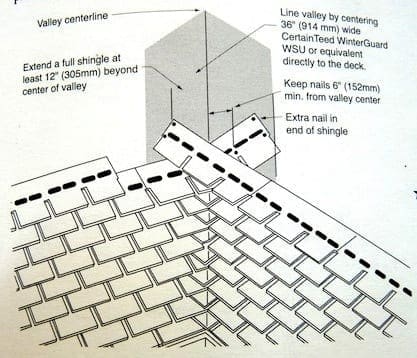
Felt should be installed in the valleys before being installed over the main roof deck. The valley felt should be nailed in 24 inch centers along the edges of the felt. Nails should be nailed through a tin cap or simplex nails should be used. If tin caps are used they should be 32-guage or at least 1 5/8 inches in diameter. Galvanized nails at least ¾ inches long, or long enough to go all the way through the sheathing should be used.
The valley underlayment should extend at least 6 inches beyond the ridge and should be cut so that it lays flat on the decking surface with no bulges and should then be nailed down.
All felt should be installed parallel to the eaves and the first course of felt should be installed at the eaves. Felt should extend at least 3/8 inch past the drip-edge and for even better protection should be extended the distance of the final roof covering which will prevent water from seeping under the drip edge where it can reach the decking and the fascia.
Align the first roll of felt at the lower left corner of the roof and secure it with on nail, then roll it out, straighten it, and nail it in the center as you go every 3 – 4 feet. Don’t just nail the opposite ends of the course because you will get bumps in the felt. Then nail along the edges on 12 -to-18-inch centers. Nail the end laps on 6-to-8 inch centers. Continue installing felt in this manner all the way up the roof until you reach the ridge. The last run of felt should be folded 6 inches over the ridge and nailed on the other side. Felt should run at least 6 inches over the ridge on both sides.
Felt should extend at least 6 inches past the hip on both sides. Felt should overlap the valley felt by 6 inches on both sides. Felt should always extend at least 4 inches up any vertical surface such as a chimney or a wall.
For single layer underlayment coverage the 2-inch top lap line should be used leaving 34 inches of underlayment exposure. For double coverage the 19 inch top lap should be used leaving 17 inches of underlayment exposure. End lap requirements vary depending on the type of underlayment used, the slope of the roof, the climate, and the local code requirements.
For 15, 20, or 30 pound saturated felts using single coverage, the end lap should be at least 4 inches.
For 15, 20, or 30 pound saturated felts using double coverage the end lap should be at least 6 inches. Some contractors recommend the lap to be 12 inches on low-sloped roofs in colder climates.
For fiberglass base sheet underlayment the end lap should be at least 6 inches.
For fiberglass ply-sheet underlayment the end lap should be at least 12 inches.
For fiberglass cap sheet underlayment the end lap should be at least 6 inches.
For mineral-surfaced rolls the end lap should be at least 6 inches.
For coated roll the end lap should be at least 6 inches.
To work with underlayment around vent pipes you should roll the underlayment up to where it touches the pipe, mark that area of the underlayment on the roll and cut a slit so that the pipe can fit through the underlayment. Adjust the felt in its final position so that it lays flat and cut the felt so that the felt fits smoothly around the vent pipe.
Underlayment for Tile Roof Coverings.
When considering the type of underlayment to use for a tile roof you should also consider the local climate, the method the tiles will be fastened, the slope of the roof, how well the tile can actually waterproof the building, and the local building codes.
In areas that are not highly humid, non-sealed underlayment systems can be installed on roof slopes of 4 in 12 or steeper when the tiles are direct-nailed to the sheathing or battens on the roof. This systems is a single 43-pound coated base sheet nailed to the deck. The sheets are installed with 2-inch top laps and 6-inch end laps. Nails should be nailed along the eaves at 24-inch centers and at 12-inch centers along the top laps. In more sever climates the laps should be sealed with roofing cement on slopes up to 6 in 12. This is known as the “sealed underlayment systems” On roof sloped greater than 6 in 12 you don’t need the roof cement.
In areas with high-winds and hurricanes, 30 pound felt should be nailed down followed by 90-pound mineral-surfaced roll roofing embedded in a solid hot mopping of Type IV (steep) asphalt. This is called the 30/90 hot-mop system. You can also use a flood coat of cold-process roofing cement. This is called the 2-ply sealed system.
The 30/90 hot-mop method should be used when you are installing the tiles with mortar or mud. You can also use it on 2 ½ – 4 in 12 sloped roofs if you are using nails to install the tiles. Hot asphalt should be used on roofs 5 in 12 to 6 in 12 slopes. On roof slopes 6 in 12 or steeper you can use cold-applied roofing cement instead of hot asphalt.
When hot mopping the 90-pound mineral surface material along the eaves, nail the top of the sheet and pull the loose edges back. Mop the back of the sheet and then flip it back over to its original position. Then walk on top of it to help it stick to the underlayment. This is called “walking in”. It is important to mop the back of the sheet and not the underlying felt. This prevents the hot asphalt from running down the slope. You can also use this method to mop 90-pound material to the valley by mopping half of the valley at a time. You can run the 90 pound down the valley
For areas such as pipes and vents, cut the 90-pound material so it slips over the penetration. Then seal the edges with roof cement.
ESTIMATING HOW MUCH ROOFING UNDERLAYMENT A ROOF WILL NEED
You will begin estimating the amount of roofing underlayment to use by calculating the square footage of the roof area. Then you will have to convert the square feet into rolls of underlayment.
One factory square is 108 square feet, after you deduct the material lost from the 2-inch top lap and the 4-inch end lap, one factory square will actually only cover 101 square feet (single coverage).
After deducting materials lost due to a 19-inch top lap and a 6-inch end lap, one factory square will only cover 49.5 square feet (double coverage).
You can figure that one factory square of underlayment will cover 100 square feet (single coverage), or 50 square feet (double coverage).
Underlayment Lap Allowance
Remember that underlayment must be lapped at least 6 inches over each side of the center of ridges and hips. Therefore, you should add 1 square foot of underlayment for each linear foot of hip, ridge, and valley. The formula is
For added protection, some contractors add a 6-inch wide strip of 30-pound felt over the hips & ridges prior to installing the hip & ridge units of underlayment.
The lap area is calculated but finding the total length of the hip, ridges, and valleys and adding 1 square foot for each linear foot of hip, ridge, and valley on the roof.
Underlayment Overcut Allowance
On gable roofs the underlayment should be cut about 4 inches beyond the rake. Later you will trim it flush with the edges. If the gable roof is going to have a tile roof installed that is trimmed with rake tiles then the underlayment is usually wrapped down over the rake fascia and nailed onto a bargeboard every 6 inches where the rake tiles will cover.
The Overcut area is calculated by finding the actual length of the rake and multiplying that by .34. To find the actual length you would multiply plan length of the building by the slope factor. Then to find the overcut area you would multiply the actual length by .34.
Underlayment Shortcut Allowance Calculation
Some contractors just add 10% to the measured coverage area on small gable roofs, and 15% on smaller hip roofs. This is for additional material allowance for ridge, hip, & valley laps, overcutting the rake edges, and crew errors. A larger percentage is calculated for more complicated roofs, and usually a smaller percentage is used for simple roofs.
How to calculate the Gross Roof Area & Allowance Factor
The formula to calculate the gross roof area is
Net Roof Area + Lap Area + Overcut Area
Now divide the gross roof area in square foot by 100 to find out the gross area in terms of roofing squares.
Now multiply the Gross Roof area in squares by 3 percent to account for crew waste. Now you have the amount of underlayment you will need for the job in roofing squares.
Divide that by the Net Roof Area in squares and this will give you an accurate allowance factor for the roof.
Divide the total amount of squares needed by the factory squares per roll of underlayment and you will know exactly how many rolls of underlayment you will need to order.
UNDERLAYMENT INTERLAYMENT (LACING)
Whether solid or spaced sheathing is used, you are required to use a felt interlayment between the courses of shakes. This keeps wind driven debris from getting into the attic during extreme weather and also acts and insulation.
The top of the underlayment must rest on the sheathing as the top of the felt must be attached to the sheathing board so if you are using spaced sheathing be sure they are spaced carefully so that the underlayment can be properly attached.
The interlayment can be omitted in some areas where there are where there is not snow and the weather exposure of the shake is less that once-third of the entire shake. (3-ply roof)
Usually shakes are applied over a 30-pound, 36-inch wide underlayment starter course installed at the eaves, and then followed with 30-pound 18-inch wide interlayment courses. Some building codes do allow 15-pound felt.
The underlayment course should be installed under the double starter course shakes at the eaves and the lower edge should be aligned with the butts of the shakes. Install the first 18-inch course of interlayment so that the bottom edge is double the exposure area of the shakes above the butts. For example if 24 inch shakes have 10 inch exposure, the bottom edge of the first course of interlayment should be 20 inches above the butts of the starter course of shakes. The felt will cover the top 4 inches of the row of shakes below and will extend 14 inches onto the sheathing.
The subsequent courses of interlayment should be installed so that the distance between each interlayment’s bottom edges is equal to the weather exposure. The top of the interlayment sheathing should be nailed at 1-2 foot centers.
ESTIMATING INTERLAYMENT QUANITITIES
For finding the amount of interlayment needed you must take into consideration the exposure of the shingles since the distance between the bottom edges of subsequent courses of interlayment must be equal to the amount of exposure. Below is a list to help calculate the amount of interlayment needed based on the exposure amount. Keep in mind that this list does not factor in the 36-inch-wide underlayment starter course felt installed at the eaves, the addition felt needed to lap the ridges, hips, and valleys, and the crew waste.
If exposure is 5-1/2 inches you will need 3.04 Factory Squares per square of underlayment and you will require 1 factory square of underlayment for every 32.9 square feet of roof.
If exposure is 7-1/2 inches you will need 2.23 Factory Squares per square of underlayment and you will require 1 factory square of underlayment for every 44.8 square feet of roof.
If exposure is 8 inches you will need 2.09 Factory Squares per square of underlayment and you will require 1 factory square of underlayment for every 47.8 square feet of roof.
If exposure is 8-1/2 inches you will need 1.97 Factory Squares per square of underlayment and you will require 1 factory square of underlayment for every 50.8 square feet of roof.
If exposure is 10 inches you will need 1.67 Factory Squares per square of underlayment and you will require 1 factory square of underlayment for every 59.8 square feet of roof.
If exposure is 11-1/2 inches you will need 1.45 Factory Squares per square of underlayment and you will require 1 factory square of underlayment for every 68.8 square feet of roof.
If exposure is 12 inches you will need 1.39 Factory Squares per square of underlayment and you will require 1 factory square of underlayment for every 71.8 square feet of roof.
If exposure is 14 inches you will need 1.20 Factory Squares per square of underlayment and you will require 1 factory square of underlayment for every 83.7 square feet of roof.
If exposure is 16 inches you will need 1.05 Factory Squares per square of underlayment and you will require 1 factory square of underlayment for every 95.7 square feet of roof.
If exposure is 18 inches you will need .93 Factory Squares per square of underlayment and you will require 1 factory square of underlayment for every 107.6 square feet of roof.
To calculate the amount of interlayment needed you will first need to find the interlayment area. The first course of 18 inch interlayment begins above the eaves twice the distance of the shingle exposure. Therefore, you will need to deduct that distance from the eaves of the roof to calculate the interlayment area. For example, if your shingles have 10-inch exposure then you would deduct 20 inches from the eaves.
You will also need to find the measurements of the hips, ridges, and valleys. If you are looking at roof plans you will need to refer to the slope factor and multiply it by the run of the hips and valleys to get the actual lengths. There is a different slope factor depending on if the plans show the run of the valleys and hips or the plan length of the hips and valley. You need to be aware of this prior to making your calculations.
So your gross interlayment area will be the calculated net interlayment area plus an additional square foot for each linear foot of hip, ridge, and valley. The net interlayment plus a square foot for each linear foot of hip, ridge, and valley will be your gross interlayment area. Divide your gross interlayment area by 100 and this will give you the total squares of your roofing area. Next you will multiply the gross interlayment area by the Factory Squares per square according to the shingle exposure. For example if your shingle exposure is 10 inches then you would need to multiply your gross interlayment area by 1.67.
Then multiply by 1.04 for crew waste.
Now you will need to account for the area covered by the underlayment starter course which is the total length of the eaves multiplied by 3’. Then divide by 100 to get the total squares to be covered by the starter course of underlayment. Add this amount to your calculation. Now divided the total squares by the Factory Squares per roll to find out how many rolls of underlayment you will need for your interlayment.
Here are some equations to calculate the coverage, exposure, and Factory Squares per square foot.
Coverage (Square foot covered for each factory square) = [(Roll Length -EndLap) x Exposure]/# of Factory Squares per Roll
Exposure = [Roll Width – Top Lap]/Number of Plies
The coverage, in factory squares installed per square (100 square foot) of roof surface covered, is
Factory square need per Square of roof = 100 sqft/sqft of coverage per factory square
Eaves Flashing (Ice Shield of Water Shield)
In areas with heavy snow there is sometimes enough heat loss from the house to melt snow on the roof. This can cause water to leak into the ceilings and walls. As snow melts it flows down the roof and freezes up again causing ice dams to form on the roof. The dams stop the flow of water and the water backs up under the shingles and through the roof sheathing. This heat loss is caused by insufficient insulation. Ice dams typically occur in areas where there isn’t enough insulation such as over windows where there isn’t enough insulation over the windows. Heat escapes up the wall and into the attic causing the ice and snow on the shingles to melt from the bottom up. Then the weight of the ice and snow above the melted areas puts pressure on the water pushing it up the slope of the roof.
What you do to prevent leaks caused by this depends on the slope of the roof and the local building codes.
On slopes 4 in 12 or steeper, in addition to the underlayment, an ice shield should be installed. The ice shield is made of one ply of 50-pound smooth-coated roll roofing or Eaves Flashing parallel to the eaves. You should provide 1/4 inch to 3/8 inch of overhang past the drip-edge. The roll or flashing should be installed 12 inches (some codes require 24 inches) up the roof past the wall line. If more than 1 roll is needed to reach that point up the roof, make sure the top lap is at least 2 inches and you should apply roof cement the entire length of the lap. If you need another roll over the length of the eaves then the end laps must lap at least 12 inches and roofing cement must be applied.
For roofs less than 4 in 12 slope you can used double-coverage underlayment for the eaves flashing. The flashing must extend 24 inches beyond the interior wall. Each course of flashing material must be embedded in roof cement at a rate of 2 gallons per 100 square feet of roof surface.
It is possible that heavy duty roll-roofing material can cause harm to the shingles since it can expand and contract depending on the temperature. This may cause the shingles to buckle. Two layers of 15 pound felt under double coverage asphalt shingles should prevent any leaks due to ice damming.
There are now more modern materials such as Polyglass IR-XE which is a rubberized rolled roofing that is self-adhesive. It simply sticks to the sheathing, and doesn’t expand with heat.
Valley Flashing
Most roof leaks happen at a valley. Therefore, flashing needs to be added to the valleys for additional protection. The materials used for the valley depends on type of valley and the type of roof covering.
Closed & Open Valleys
In a closed valley the roof covering laps over both sides of the valley. In contrast, there is a space between the roof coverings on an open valley leaving the flashing exposed. Open valleys can be constructed with all types of asphalt and fiberglass shingles. Open valleys are even recommended for T-Lock roof coverings and mineral-surfaced roll roofing.
Open valleys do tend to leak more often than closed valleys. This is because during heavy rains the water can back up under the shingles running along the valley.
Open valleys should be avoided in valleys that are formed from 2 roofs with different slopes or in valleys that allow a heavier flow of water enter the valley from one side.
You can solve a lot of leak problems that occur in valleys but constructing a closed-cut valley and installing the shingles on the lower sloped, or lower level roof first. This way the shingle on the other higher sloped roof will overlap the shingles from the lower sloped roof so that water is not running into the underside of a lap and driven up the shingles.
Woven valleys can also be used but they are only recommend when installing 2-tab shingles.
Valley Flashing Materials
On 3-tab shingle roofs, T-lock and laminated shingle roofs, and mineral surfaced roll roofs you should used mineral-surfaced roll roofing material as your flashing for valleys. You can also use metal flashing but it isn’t common as metal expands with heat.
Metal flashing should be used on open valleys for slate, wood, and shakes. Metal flashing, or metal overlaid with mineral-surfaced roll roofing should be used for open valleys on metal or tile roofs. You can get many different types of metal valley flashing such as, Galvanized steel, aluminum, copper, tin (terne plate), lead, and zinc. Aluminum and galvanized steel are the least expensive so they are used the most. The other metal flashing materials will usually be found on commercial roofs, or on roofs that have a long-life such as tile roofs.
Roll valley metal (galvanized steel flashing) comes in 26-gauge or 29-gauge galvanized steel or other metal that is resistant to corrosion. Valley metal rolls come in 50-foot rolls that are 12, 14, 16, 18, and 2 inches wide. Rain water draining down a valley carries erosive materials so it is recommended to 26-gauge metal instead of a lesser metal grade. Use at least 16-gauge copper, 12-ounce tin, 3-pound hard lead, and 11-gauge zinc wherever those materials are used for flashing.
For open valleys you can keep water from getting under the shingles by installing metal with a w-shape crimp (splash diverter rib) which is in the center of the water guards along the edge. In valley that might have a lot of debris build-up you should install flashing with double crimp. If you install flashing with water guards, you must anchor the flashing to the sheathing with metal clips. Many contractors recommend using metal clips instead of nails to secure the metal flashing to the sheathing. This is because the metal clips can expand and contract with the metal flashing.
Installing Non-Metal Valley Flashing
For closed valleys you can flash the valley with 36″ wide 15-pound or 30-pound asphalt saturated felt. However, it is recommended to use mineral-or smooth surfaced roll roofing that is 50-pound or heavier. If more than one stip is needed over the length of the valley then you should over lap the top strip 12 inches over the bottom lap and bond the two strips with roof cement. Don’t apply too much roof cement because it can cause blistering. Don’t even nail in the valley. Nails should only be applied within 1 inch of the edge of the flashing and you should use only enough nails to hold it in place as nails holes are vulnerable for leaks. When installing the top layer of roll roofing you should use a color that is the same color as the shingles or at least neutral.
Installing Metal Valley Flashing
Roll the metal down the valley and step on the center so that is conforms to the valley while also nailing the metal down every 12-inches within 1 inch of the edge of the rolled out metal. If the flashing has water guards the use metal clips instead of nails.
If more than one piece of metal is needed, the top layer should be lapped over the lower piece by at least 6 inches and the lap should be bonded with roof cement. Never drive nails within the valley.
You should extend the metal flashing beyond the ridge and you should cut it so that it conforms flat on the sheathing. You should then nail it down. You should lap the metal in areas where two valley intersect with each other and seal the laps with roof cement.
For wood shingle roofs you should extend the metal valley flashing at least 10 inches beyond each side of the centerline of the valley on roofs with slopes up to 6 in 12, and 7 inches beyond the centerline on roofs with roof slopes of 6 in 12 or steeper. Snap a chalk for a shingle guide 2-4 inches on either side of the valley flashing depending on the anticipated flow of water.
Underlayment isn’t needed under metal valleys on shakes & wood-shingles but you should install a 36-inch-wide strip of felt. Especially in cold areas with wind-driven snow. Not only does the underlayment help protect against leaks, it also prevents condensation that could corrode the metal. However, code permitting, some contractors don’t recommend the felt underlayment for shake roofs because it can also trap moisture keeping it fro evaporating.
On shake roofs, extend metal valley flashing at least 10 inches beyond each side of the centerline of the valley. Install a 35-inch-wide roll of 15-pound felt beneath the metal flashing.
Some roofers don’t recommend feld beneath any valley metal except copper or lead since the felt keeps condensed water beneath the metal from running off and evaporating. When you use felt to head off wind-driven rain, it’s very important to paint the underside of the metal valley.
Estimating Valley Flashing Material
When estimating, you will take off roll roofing flashing material by the square foot, and then convert it to roofing squares. Take off metal flashing by the linear foot. You must account for end laps and overcuts for valley ends at inside roof corners. In most cases add 1 foot to the valley length to allow for additional material. Some roofing contractors cut the material off at the lower end, forming a small triangular extension that helps shed runoff water away from the building.