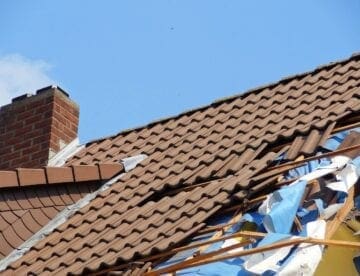
Flashing at Chimneys and Other Vertical Structures
Any flashing turned up on a vertical surface is called a base flashing. Flashing built into the vertical surface and bent down over the base flashing is called counter-flashing or cap flashing.
If the horizontal width of a chimney is greater than 2 feet, install a fabricated galvanized metal saddle flashing, or a wooden cricket. The cricket, or saddle helps keep ice and snow from building up at the upper side of the chimney, and diverts rainwater around it. Build the saddle flashing or cricket with the same slope as the main roof.
Apply asphalt shingles up to the lower edge of a chimney before you install any metal flashing material. Then install the base flashing on the down-slope face of the chimney. Make this piece so the lower part goes at least 12 inches up the chimney face. Apply a bed of asphalt plastic cement over the shingles and masonry and set the entire flashing in it. Drive only enough nails through the flashing into mortar joints to keep the flashing in place until cement sets. Apply a coat of asphalt primer to any masonry surface before you apply roofing cement. That seals the masonry and provides good adhesion between the cement and the masonry.
You can buy special flashing cements you can use at all temperatures and on wet or dry surfaces. This cement comes in one-gallon cans of five-gallon pails.
Install metal step flashing (baby tins) and shingles at the sides of the chimney.
Install the base flashing at the rear of the chimney and over the cricket. Extend the flashing at least 6 inches onto the roof sheathing and 6 inches up the chimney.
Install shingles over the cricket, or up to the cricket valleys. Install any shingles you apply over the cricket in a bed of asphalt plastic roof cement. You don’t have to install shingles over a metal cricket if you can’t see it from the ground or surrounding viewpoints.
Install metal cap flashing not more than 3 bricks high. Chisel and rake clean the mortar joints to a depth of 1-1/2 inches before you install the cap flashing. Make some mortar that’s 1 part portland cement and 3 parts fine mortar sand, and refill the joints with it. Wet the joints before you apply the fresh mortar
You can also caulk the joints after installing the pieces of flashing. Install the cap flashing in one piece installing it at the sides and backs of the chimney as individual pieces. Start at the lowest point first. Each piece should be installed into mortar joints so that each unit of cap flashing overlaps the base flashing by a minimum of 3 inches. Bend the last piece of cap flashing around the upper corners of the chimney. You can use a high quality butyl rubber sealant to seal the flashing joints in the corners. All exposed flashing should have its bottom edge turned under 1/2″ This will add stiffness and will prevent snow from packing up behind the flashing.
Where are sloped roof meets a vertical surface such as a wall you should use galvanize metal step flashing. The step flashing will later be protected by cap flashing installed in the masonry or by siding. The step flashing pieces should overlap by at least 2 inches and the metal flashing should be extended under the shingle and up the chimney about 4 to 5 inches