FLIR camera images can help conduct comprehensive roof inspections. However, using a FLIR camera during a roof inspection is one thing, but accurately interpreting thermal images is another. Knowing how to interpret thermal camera images can help detect moisture, insulation issues, and other roofing problems.
Forward-Looking InfraRed (FLIR) cameras have revolutionized the field of professional roof inspections. Contractors can gather valuable information about a roof’s condition without requiring invasive procedures. This process can help uncover potential roofing problems before they become major issues. Roof inspections with a FLIR camera can help homeowners care for preventative maintenance.
This article is a guide to interpreting thermal images taken using a FLIR camera. You will learn the principles of thermal imaging and how to detect moisture and insulation problems in roofs and buildings.
Are you a homeowner looking to conduct a DIY roof inspection or a professional roofing inspector? If so, this comprehensive guide will equip you with the knowledge and skills to make informed decisions based on FLIR camera images.
Understanding FLIR Camera Images
A FLIR camera is one of the most important tools during a professional roof inspection. The thermal camera helps you detect temperature variations in a specific area. FLIR cameras display these differences using a color palette. The color palette ranges from cooler colors like blue and green to warmer colors like red and yellow.
An infrared camera works by making images from heat, not visible light. Specialized sensors in the camera detect the differences in temperatures that damp areas and dry areas emit. Simply put — damp areas are typically cooler than dry areas because of moisture evaporation.
An infrared imaging camera uses a color palette to show various temperatures in the thermal image. This allows you to identify structural damage, air leaks, plumbing leaks, moisture issues in roofs, and other potential problems that are invisible to the naked eye.
Infrared cameras apply color mapping to thermal images to make data interpretation easier. Typically, hot spots appear in red, orange, or yellow — colors typically associated with heat. On the other hand, cooler areas are displayed in blue or green. Moisture might appear as distinct darker patches or spots contrasting with brighter, warmer colors.
Related reading: What to look for during a routine roof inspection.
Signs of Moisture in FLIR Images
When performing roof inspections using FLIR cameras, it is crucial to understand how moisture problems appear in thermal infrared images. Remember — a FLIR camera doesn’t detect moisture. It detects the differences in temperatures between damp patches and dry patches. Therefore, you must choose the right time and conditions to check for roofing problems.
Moisture problems typically appear as dark or cool spots in thermal images. These dark blue or green patches can indicate wet insulation, water leaks, or damp drywall. However, water pooling on a flat roof may also appear as a possible roof membrane issue, although there is no leak.
Accurately interpreting FLIR camera images involves considering various factors. These may include weather conditions, cloud cover, recent rainfall, and ambient temperature. For example, suppose the outdoor temperature is the same as the damp insulation. In that case, the thermal images will not show any problems.
It’s good to remember that the darker patches could indicate that the area is cold. However, it doesn’t mean that there is moisture buildup. That is why it takes skill and experience for a professional contractor to interpret infrared camera images.
Here are some FLIR camera images showing dampness on a ceiling from a water leak. 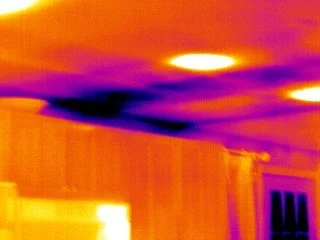
Image courtesy of flir.com
Notice the irregular shape of the dark purple patches. They are more intense where the ceiling meets the wall. It’s also obvious how the water has spread out.
Unfortunately, most homeowners wait until water starts dripping from the ceiling or they notice brown patches before calling a local roofing contractor. However, extensive water damage to the roof structure and severe issues with dampness and mold may already be present by this time.
Detecting Insulation Issues in FLIR Images
An infrared camera is ideal for detecting home insulation issues. The thermal images can show signs of inefficient roof insulation or heat loss around windows and doors. It can be a valuable tool to identify areas of heat loss or thermal inefficiencies.
Here are some ways how a thermal imaging camera can help detect where your home is leaking heat:
- Inside your home, look for dark colors which indicate colder areas on walls.
- Check pipe insulation to see if excess heat is lost from hot water pipes.
- Outside your home, use the FLIR camera to look for bright patches — orange or red — to see where heat leaks. Typical places are around windows, doors, or air conditioning installations on roofs.
- Dark, cold spots on a building’s exterior or roof can indicate excessive moisture or dampness issues.
When using a thermal imager in Florida outside, it’s best to wait until evening or night. This is because there are greater temperature differences between the air temperature and your property’s temperature.
Identifying Other Roofing Problems with FLIR Cameras
A FLIR camera is useful for identifying more than roofing problems caused by leaks.
For example, you can use a FLIR camera to detect areas of missing insulation, poor ventilation, or damaged shingles. Missing insulation will appear as cold spots on the thermal imaging camera’s screen. Poor ventilation will cause a large area to be cooler than surrounding areas. Shingle damage will show excessive heat loss from a single point.
Other uses for thermal imaging cameras include the following:
- Detecting problems with electrical systems and wiring.
- Checking for pests like rodents in crawl spaces or attics.
- Finding your pet in the dark.
- Home security to see if anyone is lurking behind bushes.
- Gas leak detection.
When to Call a Professional
It’s always best to call a professional roofing professional if you notice anomalies in the thermal images. A qualified contractor can confirm if there are roofing problems causing dampness, moisture issues, or excessive humidity in your home. They can also advise on how to improve your home’s energy efficiency.
If you suspect a leaking roof, missing insulation, or other roofing issues in your home, call Code Engineered Systems today. Our expert team of roofing experts will use thermal imaging and other advanced tools to identify and resolve any problems with your roof.
Don’t wait until water starts dripping from the ceiling — get help now and protect your home from costly damage.
Conclusion
A FLIR camera is a small investment to detect and prevent potential issues with your roof — leaks, insulation problems, or moisture — from becoming major repair issues. Knowing how to interpret thermal images can help you quickly identify and resolve roofing issues. This can save you thousands of dollars on roof repair bills and slash your energy costs.